
Find out more about how to customize your WebShop content using Visual Editor, our intuitive drag-and-drop tool.
Purpose and scope
Visual Editor (formerly Visual Page Builder) lets you customize the content in your WebShop with intuitive drag-and-drop functionality and interactive configuration controls, so your brand and content shine. Content can be created for WebShop using Pages in the Management Interface or the Visual Editor in WebShop.
This article describes how to use Visual Editor to build great content pages directly in WebShop. Next, read How to add, edit or delete blocks using Visual Editor? for a step-by-step guide on how to build a content page using blocks. Read Exploring available block types for a full list of blocks and their purpose.
Benefits
Key benefits are:
-
Access to the Visual Editor - an intuitive, interactive interface with a predictable, consistent user interface that helps create content quickly and efficiently.
-
When you launch, you have access to a simple, fully functioning WebShop that allows your customers to browse your catalog, find out about your brand, and place orders.
-
Any changes you make can be done at a time that suits you.
-
Any changes you make are published immediately, so it is quick and easy to update your WebShop as you go.
How it fits together
Note
-
To use the Visual Editor, you must have been assigned permissions to use Pages, our Content Management System. Read Screen layout: Administrators for more information.
-
Since Visual Editor is a tool to create and manage content pages in your WebShop, you cannot use it to edit catalog content (such as product details, category names, and so on), main menu, header, and footer.
Visual Editor is a drag-and-drop editor that lets you add or edit WebShop content pages. When opened from within WebShop, its navigation options and settings controls are located in the top navigation bar and the left-side panel. The main content body contains the content of the page you are editing.
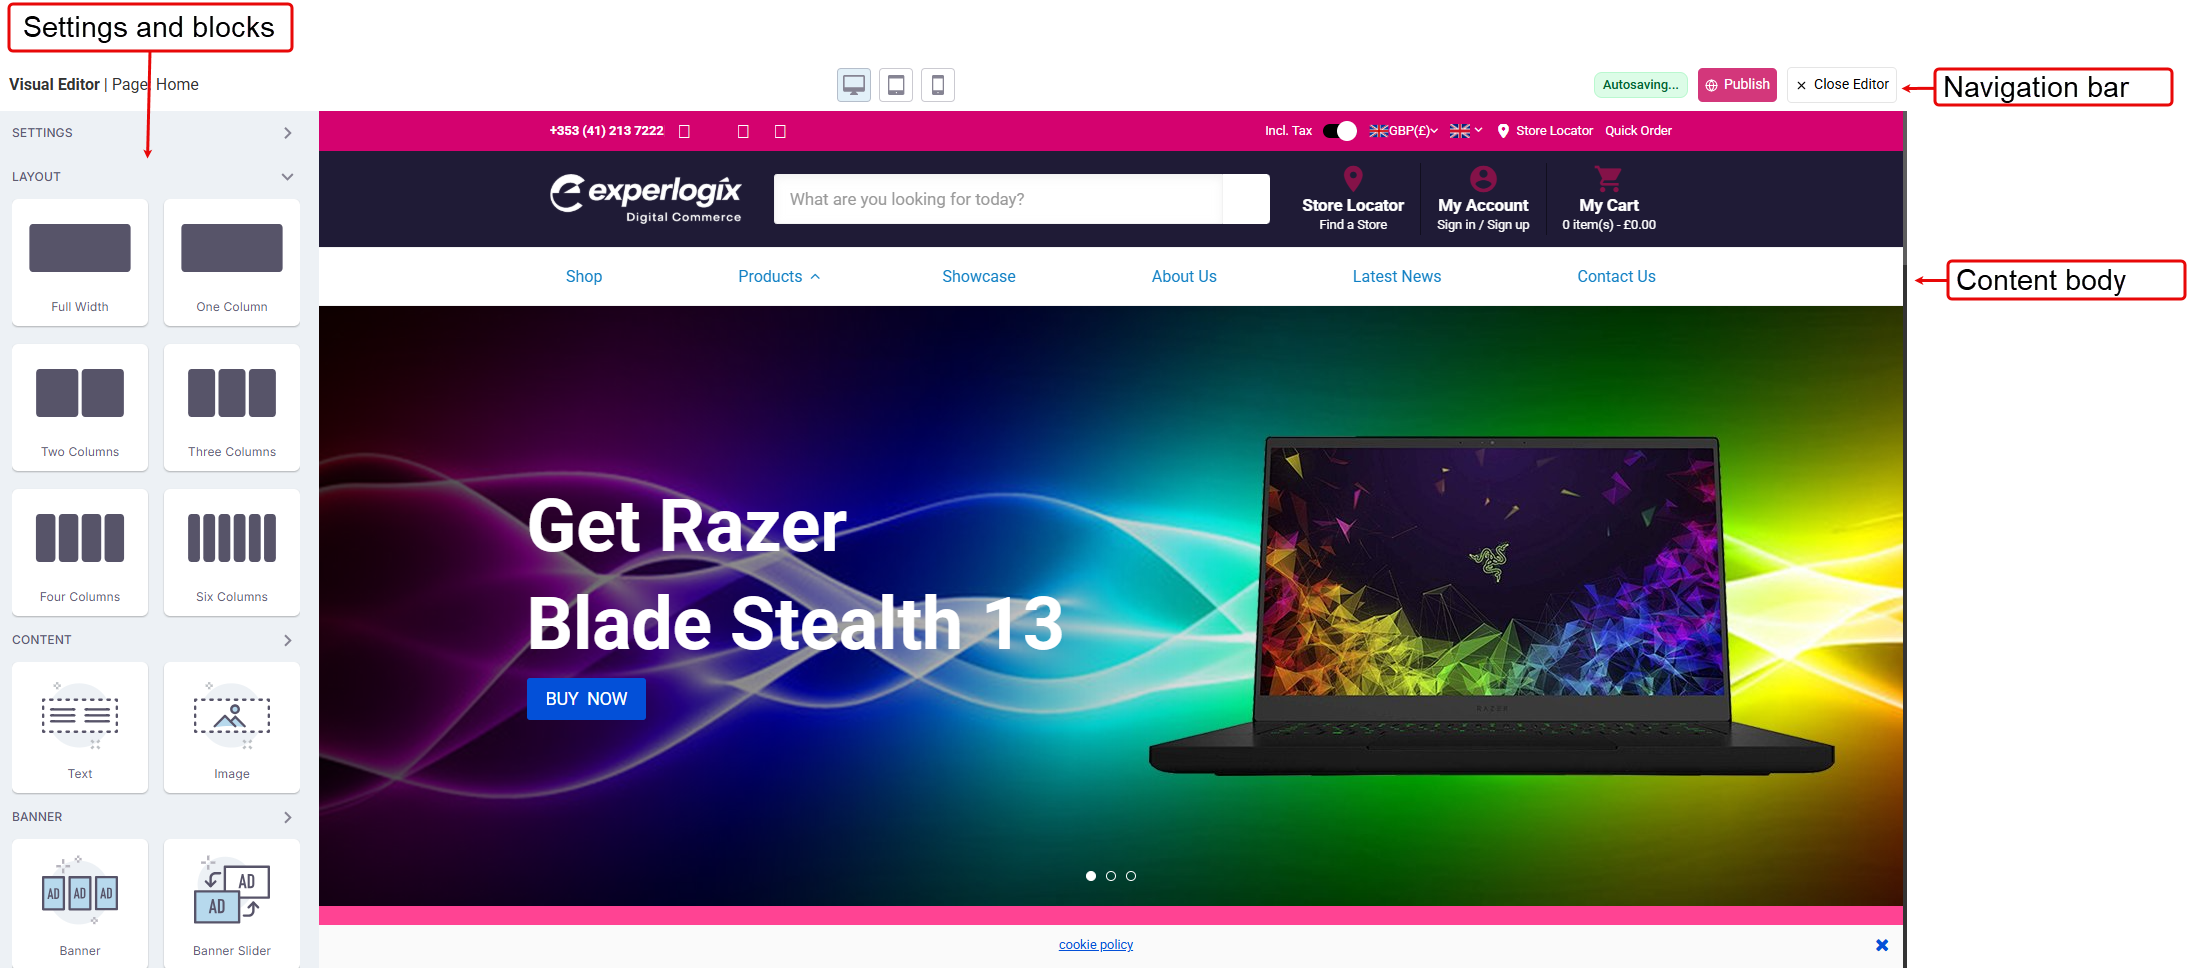
The screen consists of three key elements:
Top navigation bar

Use the top navigation bar to
-
See the page name and its status.
-
Use the Device Switcher preview tool to see how your changes will look across different devices before publishing.
-
Publish your changes. Selecting Publish clears the cache and publishes changes, which are immediately visible in WebShop.
-
Close the Visual Editor. This closes the Visual Editor and returns to the published version of the same page in WebShop.
Settings and blocks
Use the panel on the left to
-
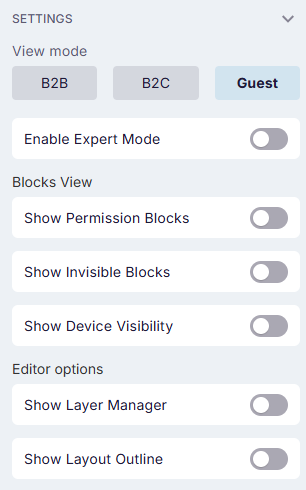
View and modify Settings.
More information
-
View mode. Select to view what your B2B, b2C or guest customer sees when they open WebShop.
-
Enable Expert Mode. By default, the Visual Editor opens in Basic mode, which includes a set of default blocks. Enable expert mode to get access to additional blocks for more advanced functionality. The extra blocks that are usable once enabled are: Preselected categories, Latest Listing Slider, CMS Slider, Tabs, Animate In, and Add to Cart.
-
Blocks View
-
Show Permission Blocks. Displays blocks with the message “Hidden for <customer type>” if permissions on that block are different from the selected view.
-
Show Invisible Blocks. Each block that you drag and drop into the main content body can be hidden. This means that it is not visible in your WebShop. You can view all hidden or invisible blocks by using this option.
-
Show Device Visibility. Applicable for Full Width block only. Each Full Width block has a setting called “Hide on Device” that lets you specify whether the block is visible or hidden on a specific device (Mobile, Tablet, or Desktop). You can view blocks that are invisible for a particular device using this option.
-
-
Editor options
-
Show Layer Manager. Select to display a navigational tree of all blocks in the content body in a panel to the right of the screen.
-
Show Layout Outline. Select to display a dashed box around each section on the page.
-
-
Drag and drop the required block into the main content body, then configure it. Read our feature guide on available blocks for a full list of blocks and how they operate.
Content body
The content body contains a visualization of the sections, blocks, and content on the open page.
More information
Set up
Visual Editor is included by default, so no additional setup is required.
Open Visual Editor
Assumptions
-
You are logged into WebShop.
-
You have permissions for Pages, which also give you access to the Visual Editor.
Open Visual Editor from either WebShop or the Management Interface.
-
In WebShop, select Visual Editor from the menu bar at the bottom of the WebShop page you wish to edit.

-
In the Management Interface, open Pages and select the

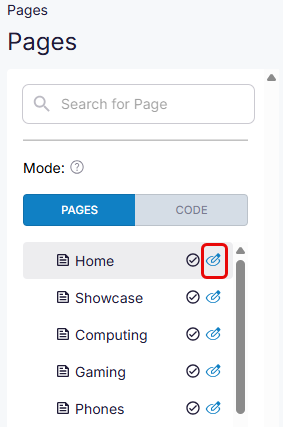
Create content using Visual Editor
Drag and drop blocks from the Layout section in the panel on the left to the main content body, configure the block options, and add your content. Select Publish to make your changes visible immediately in WebShop. Read a step-by-step guide on how to add, edit or delete blocks using the Visual Editor for more information, or discover all the available blocks you can use to create visually appealing content.
Related content