Skip table of contents

Customize Account Dashboard

Purpose and scope

The Templates Editor feature is a code-based design tool to extend the look and feel of your Account Dashboard.

We have exposed objects and variables in the Account Dashboard, allowing you to add messages, links to customer promotions, and/or move the order of elements contained in the body of the Account Dashboard screen. Use our Using account dashboard icons feature to re-order menu items on the Account Dashboard. We have also introduced a TWIG block to our Visual Page Builder, which allows you to use the Template Editor on content pages.

This article demonstrates how you can customize your account dashboard using the Templates Editor.

Key points

  • If you are comfortable with HTML, CSS and variables, you’ll be in a good place to use this feature to achieve a personalized look and feel for your WebShop.

  • You are responsible for ensuring that the code you have written doesn’t adversely affect your WebShop.

Introducing terms and concepts used in this article

Term

Definition

Cascading Style Sheets

(CSS), describes how HTML elements are displayed on screen and can control the layout of multiple webpages at once.

Hypertext Markup Language

(HTML), the standard markup language for creating Web pages, used to describe the structure of a Web page.

Twig

an open source template engine which we refer to as our templating language. It consists of a standard syntax that uses expressions, variables and tags to control the content and logic of each template or code snippet.

Use case 1: Add a welcome message to the top of your Account Dashboard

Add welcome message

To add a personalized welcome message at the top of your Account Dashboard, add the following code to “dashboard-pre.twig” and click Save.

<h2> Welcome back, {{customer.Name}}! </h2>

Watch

Use case 2: Add a promotion to your Account Dashboard

Use case 2

To add a promotion to the top of your Account Dashboard visible to your B2B customers, add the following code to “dashboard-pre.twig” and select Save. This code includes a link to a specific location in your catalogue, which lists your Sale Items.

{% if account.Type == 'B2B' %}

    <div style="background-color: #333333; color: #ffffff; padding: 20px; border-radius: 5px; margin-top: 20px;">

        <h2>Special Offers for B2B Customers!</h2>

        <p>Exclusive deals and discounts await you. See <a href="https://templating-demo.staging3.aphix.dev/on-sale/c-852.html">exclusive customer offers</a> just for you!</p>

        <hr/>

    </div>

{% endif %}

Watch

Use case 3: Move elements of your Account Dashboard page around

Use case 3

The Account Dashboard contains several data elements relating to your customer’s account. This use case demonstrates how to move these elements around within the table.

Before changes, the Account Dashboard looks like this:

UseCase3-SwapElements-Before.png

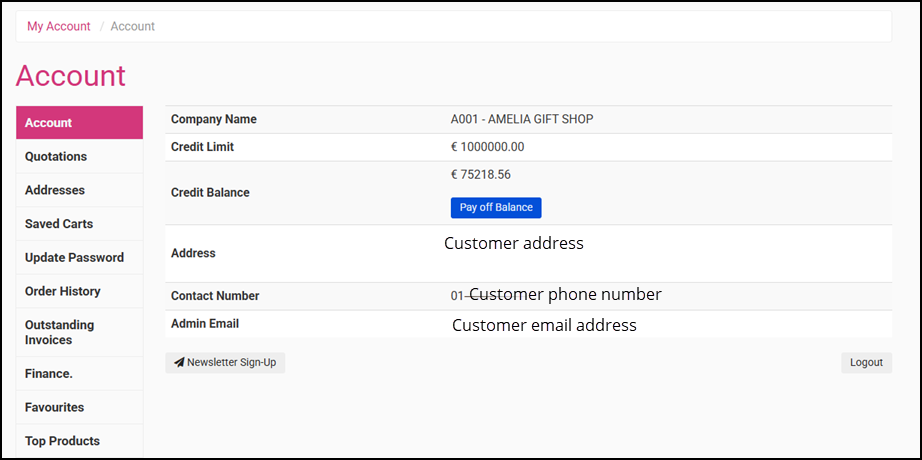
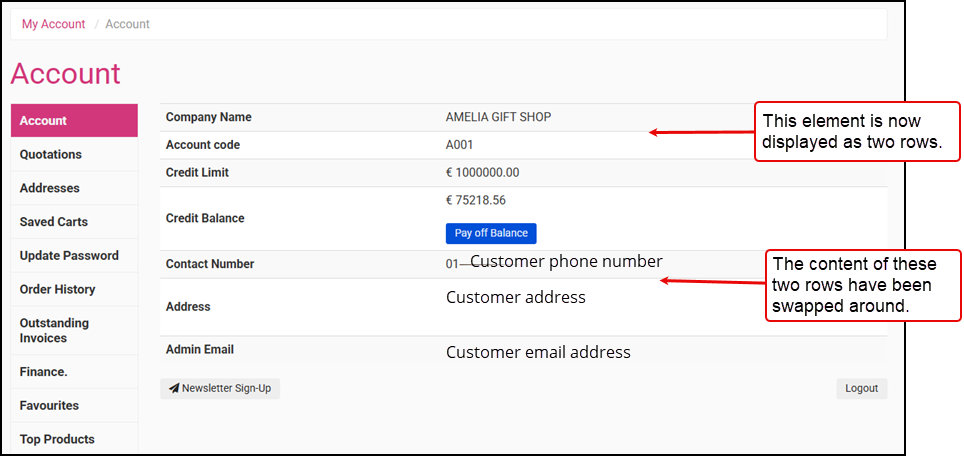
In your updated version, you would like to

  1. Have customer code (“A001”) and customer name (“AMELIA GIFT SHOP”) on different rows.

  2. Have the customer’s contact number appear on the row before their address.

UseCase3-SwapElements-After.png

To achieve this, open dashboard.twig, locate the code you wish to move/edit, make your changes, and select Save.

For 1. above, find and change the following code:

From

CODE
<tr>
        <td><strong>{{ translation('customer.dashboard.name') }}</strong></td>
        <td>
            {{ (features.dashboard_show_account_code) ? (customer.Code ~ ' - ') : '' }} {{ service_call('name') }}
        </td>
    </tr>

To

CODE
    <tr>
        <td><strong>{{ translation('customer.dashboard.name') }}</strong></td>
        <td>
            {{ service_call('name') }}
        </td>
    </tr>
        <td> <strong> Account code </strong> </td>
        <td>
            {{ (features.dashboard_show_account_code) ? (customer.Code) : '' }}
        </td>
    </tr>

For 2. above, open dashboard.twig, find the class you want to move and copy and paste it to the new location

From

CODE
 <tr class="account-dashboard-email">
        <td><strong>{{ translation('customer.dashboard.contactemail') }}</strong></td>
        <td colspan="3" style="word-break: break-all">{{ service_call('email') }}</td>
    </tr>  

    <tr class="account-dashboard-phone">
        <td><strong>{{ translation('customer.dashboard.contactnum') }}</strong></td>
        <td colspan="3">{{ service_call('phone') }}</td> 
         
    </tr>

To

CODE
<tr class="account-dashboard-phone">
        <td><strong>{{ translation('customer.dashboard.contactnum') }}</strong></td>
        <td colspan="3">{{ service_call('phone') }}</td> 
         
    </tr>

    <tr class="account-dashboard-email">
        <td><strong>{{ translation('customer.dashboard.contactemail') }}</strong></td>
        <td colspan="3" style="word-break: break-all">{{ service_call('email') }}</td>
    </tr>  

Watch

Use case 4: Add a YouTube video to the bottom of your Account Dashboard

Use case 4

To add a YouTube video to the bottom of your Account Dashboard that is visible to your B2B customers, add the following code to “dashboard-extra.twig” and select Save. This code includes a link to a recent Customer Webinar from Experlogix Digital Commerce.

CODE
{% if account.Type == 'B2B' %}
    <div style="background-color: #000000; color: #ffffff; padding: 20px; margin-top: 12px;">
        <p>Watch a webinar on <a href="https://www.youtube.com/watch?v=wsG3BH63EFc" target="_blank">recent updates in Experlogix Digital Commerce</a></p>
        <hr/>
    </div>
{% endif %}

Watch

What will my customers see in WebShop?

The code changes you have made are immediately visible in WebShop.

Related content

JavaScript errors detected

Please note, these errors can depend on your browser setup.

If this problem persists, please contact our support.